A mercenary agent in the universe of Nite Team 4 (Fan post.. information in this post is for the game only)
This post is part of a series I wrote for the game Nite Team 4 - Military Hacking Division.
As Nite Team 4 agents, we’re very lucky to have the StingerOS. The tools in it help us gain information about networks and find different vectors of gaining access. This tutorial covers the Social Engineering Toolkit (SET).
When to Use SET
One of the first questions I frequently get asked about SET is when to use it. This is a two fold answer. Sometimes it’s pretty obvious that you need to use SET as the agency who reached out to you has told to. The other times it might not be quite as clear cut. I personally use SET in two distinct circumstances:
- The first time I learn about a target.
- Every single subdomain I fingerprint returns with no potential vulnerability to exploit and I can find no other domains, subdomains, or IPs to explore.
In the end, it’s up to you agent to figure when is the best time to use it.
How To Use SET
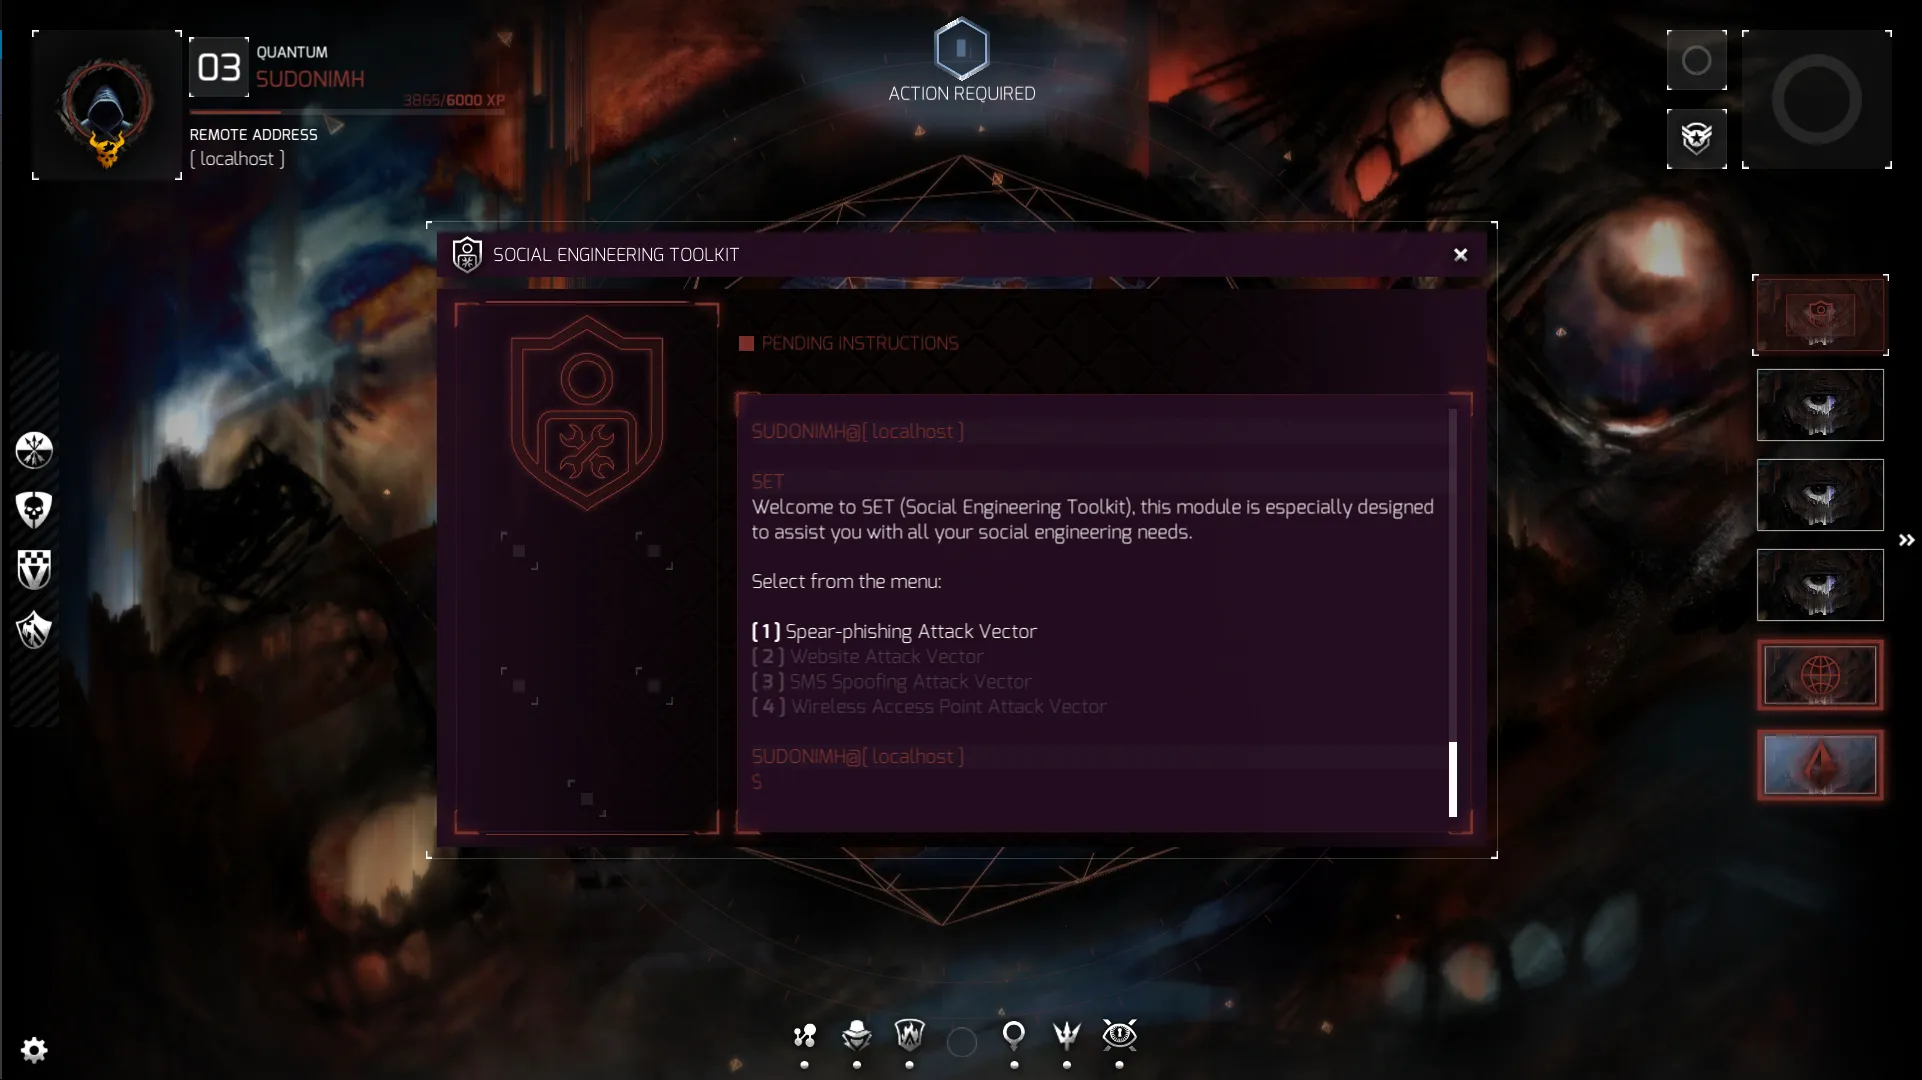
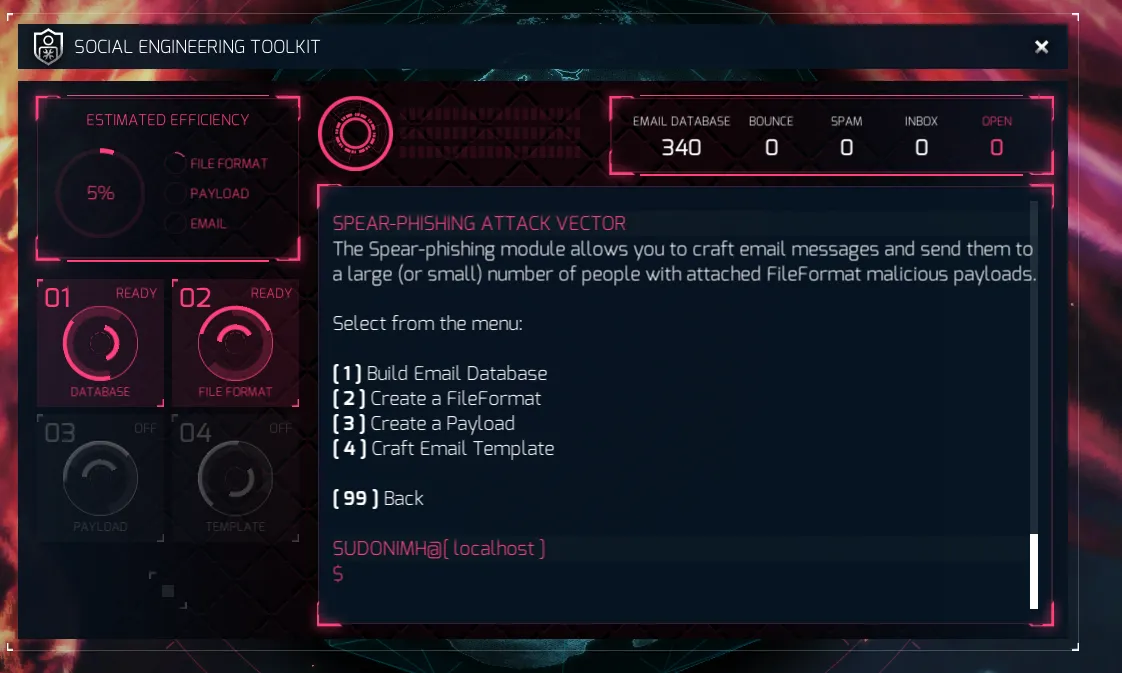
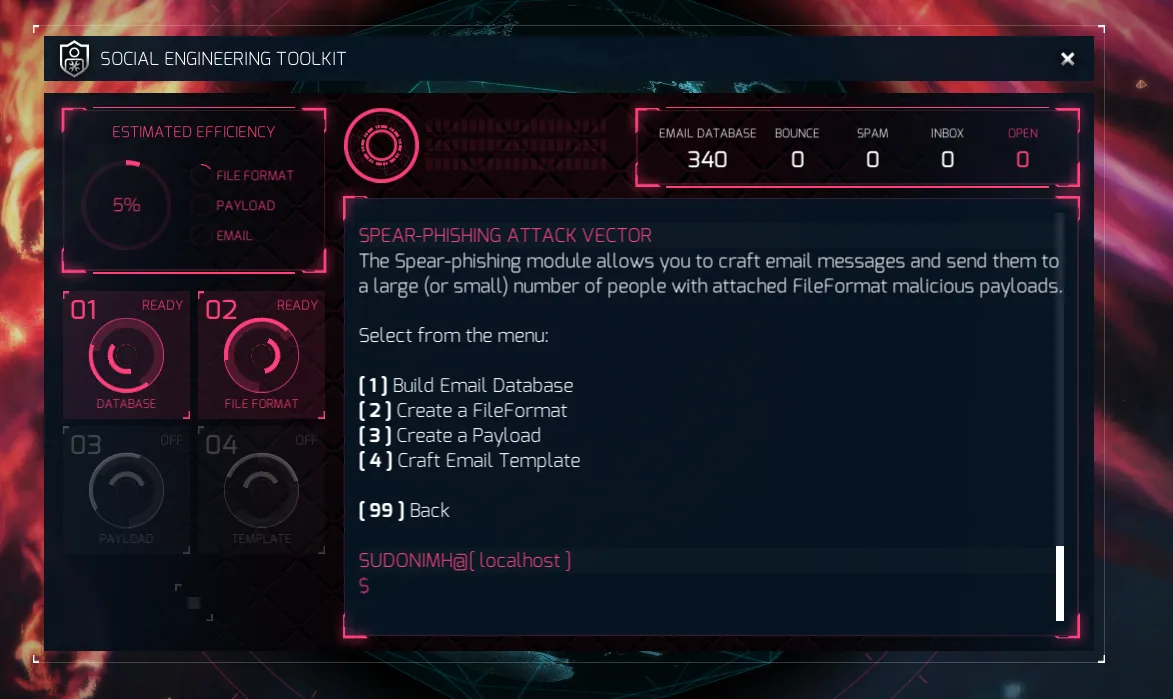
When you first open up SET you’re presented with this interface:
At this current moment in time, the StingerOS only has option 1 available for agents to use, but let me take a moment and explain what each option is and means.
- Spear-phishing Attack Vector creates an email with the intent for someone to open the attachment (the vector of attack) thus delivering your payload to the device it was opened on.
- Website Attack Vector: This can actually take several forms, though it is unclear at the moment what agents will have access to. Possible tools could include putting a payload on a website that a visitor downloads, a fake credible looking website asking for a user to input information, exploiting browsers that run applications like Java, Flash, Adobe PDF Reader, etc.
- SMS Spoofing Attack Vector: An SMS (short message service) is a text message that your phone receives. How agents will use it in the future is unknown, but a possible use is pretending to be another phone sending a message. Imagine if your boss sent you a text saying they needed the code to the server room because they are working late and left something in there?
- Wireless Access Attack Vector: Again, not available yet, so not sure how agents will use it, but a possible one is pretending to be a wireless network that a target connects to allowing you to sniff all the packets! Or maybe even display a fake credible website to get a user to input important information and data.
Now, in our case, as I said above, we agents of Nite Team 4 only have access to the first one. So let’s go ahead and get started with that.
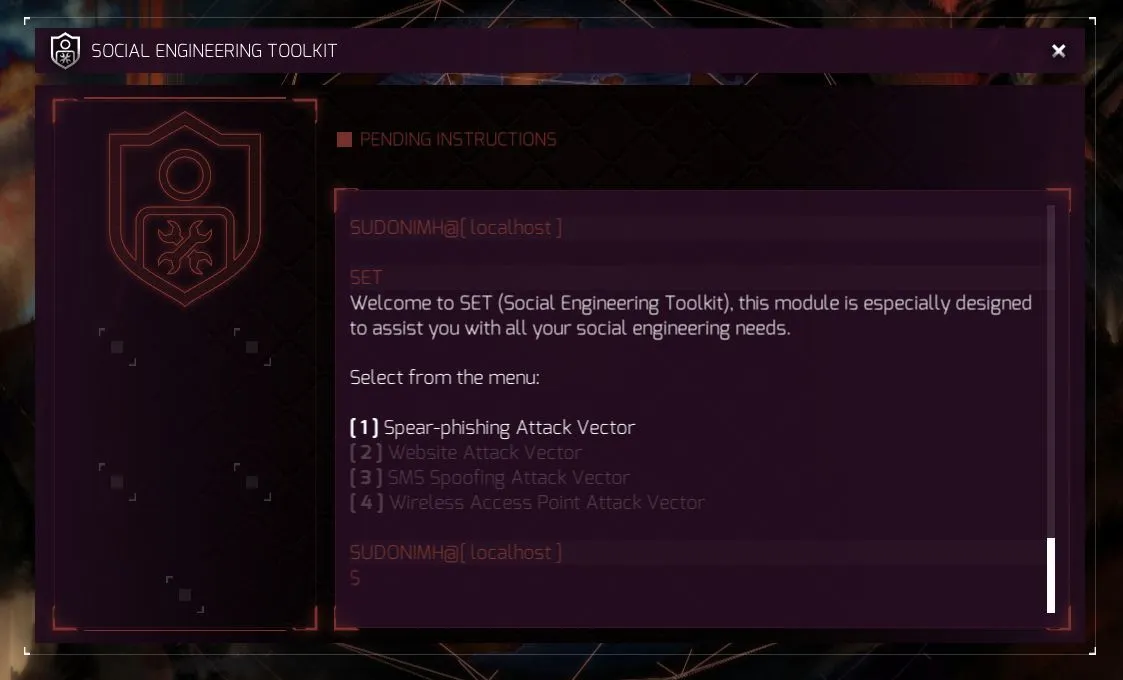
In the upper left, we have the “Estimated Efficiency” of our SET creation. It looks at our file format, payload, and email template for the spear-phishing attack to see just how effective it will be. The higher, the better, obviously!
To perform a spear-phishing attack, we need to create the 4 parts of the attack:
- We need to build a list of emails to send the attack to.
- We need to create the file we are going to use as an attack vector.
- We need to create what we want the attack to payload.
- And we need to create the email with content that we hope inspires the individual who gets it to open the file with the payload.
Let’s start with the first one and build a list of emails to send the attack to:
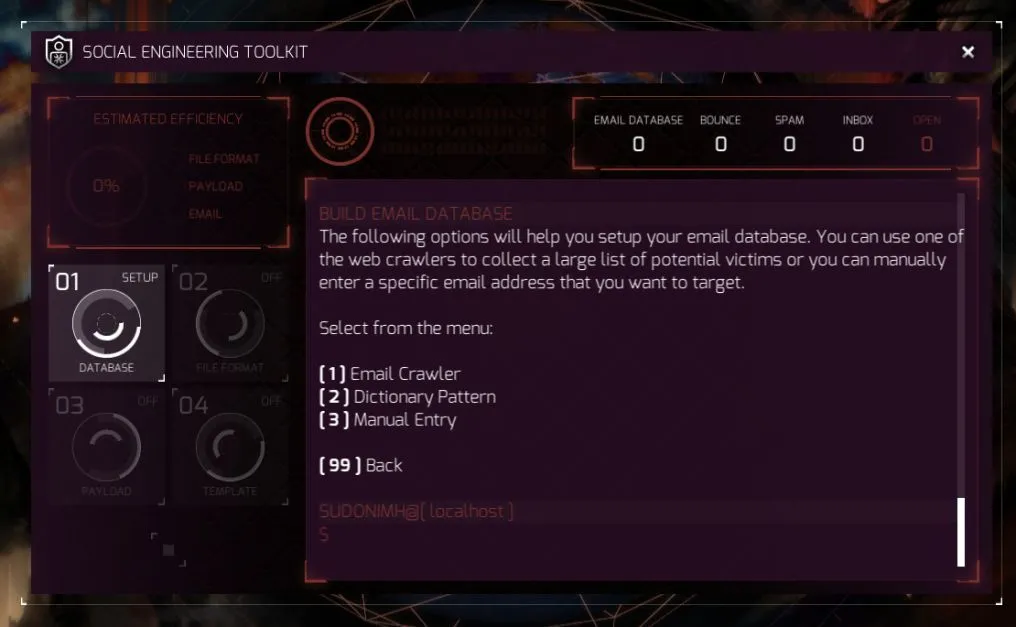
You now get to make a choice:
- Use an Email Crawler that searches Google, Bing, and other databases to find email address relevant to a specific domain.
- Use the Dictionary Pattern to troll through LinkedIn and use common names and variations to try and “brute force and identify existing email addresses” (as quoted by SET).
- Or manually enter an email address based on information you may have gathered during your investigations.
Once you select one, you need to input information to help SET build the database.
If you with with option 1, you need to give a domain for it to look for. If you went with option 2, you need to enter the name of the company. And finally if you went with option 3 you need to supply the email address of your target.
Tip: If you don’t have a target’s email, and you find nothing with the company name, or domain, then you’re using the wrong tool to gain access to the network. Try looking at the DNS & VHost Mapping Tool.
In this example, I used the first one and put in a domain. The result is that it found 340 emails to send my spear-phishing attack! You can see that in the upper right of the screen below.
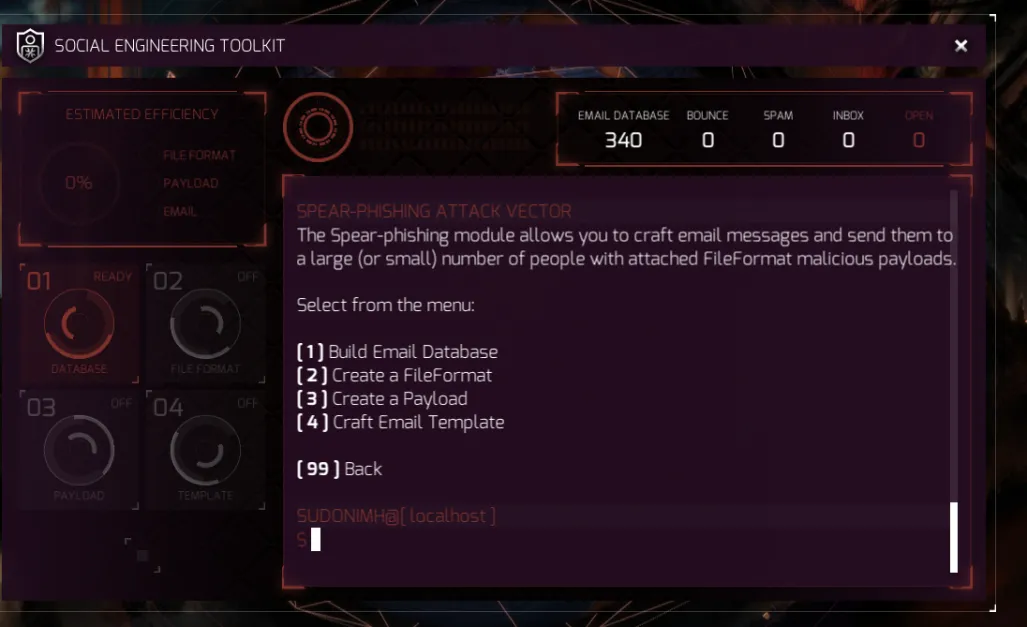
Now we need to create our FileFormat. Remember from above that this will impact our estimated efficiency.
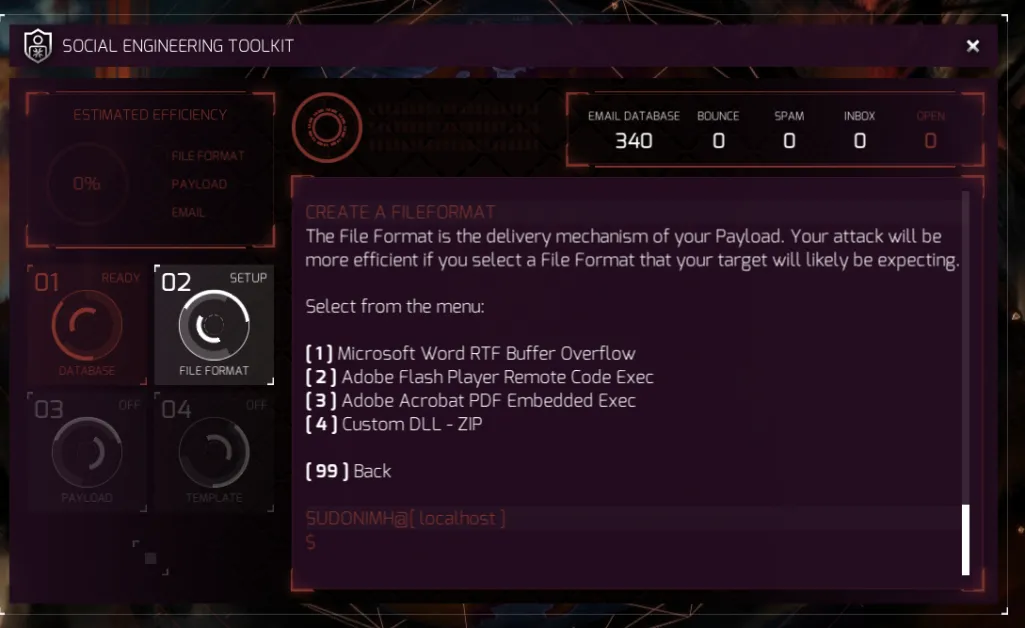
As SET points out above, the right file format has a better chance of success if you use one your target expects.
*Security Tip: If someone sends you an email with an attachment, pick up the phone, call them, and verify that they sent the attachment, and what it is called.*
SET lists 4 options for file formats for spear-phishing attachments:
- Microsoft Word RTF using a Buffer Overflow exploit.
- Adobe Flash Player using a Remote Code Exec exploit.
- Adobe Acrobat PDF using Embedded Exec exploit.
- A custom DLL in a zip archive format.
For this tutorial, I am going to show what impact each one of these four options has on your efficiency.
Note: I changed my skin to the Phoenix Skin to better show the interface.
Option 1: Microsoft Word RTF Buffer Overflow
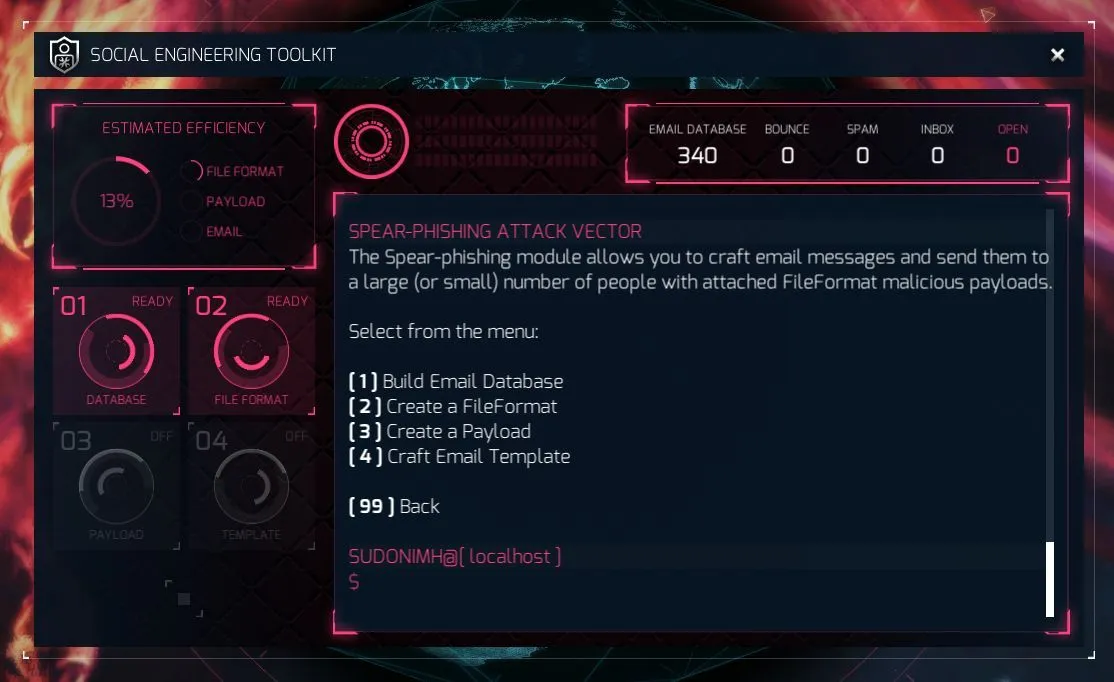
Option 2: Adobe Flash Player Remote Code Exec
Option 3: Adobe Acrobat PDF Embedded Exec

Option 4: Custom DLL - ZIP
Which option would you pick?
The obvious answer is number 3. Why? it gives us the highest efficiency return. A fantastic 30% versus 5%, 13%, and 5%.
Great! Now let’s look at the payloads:
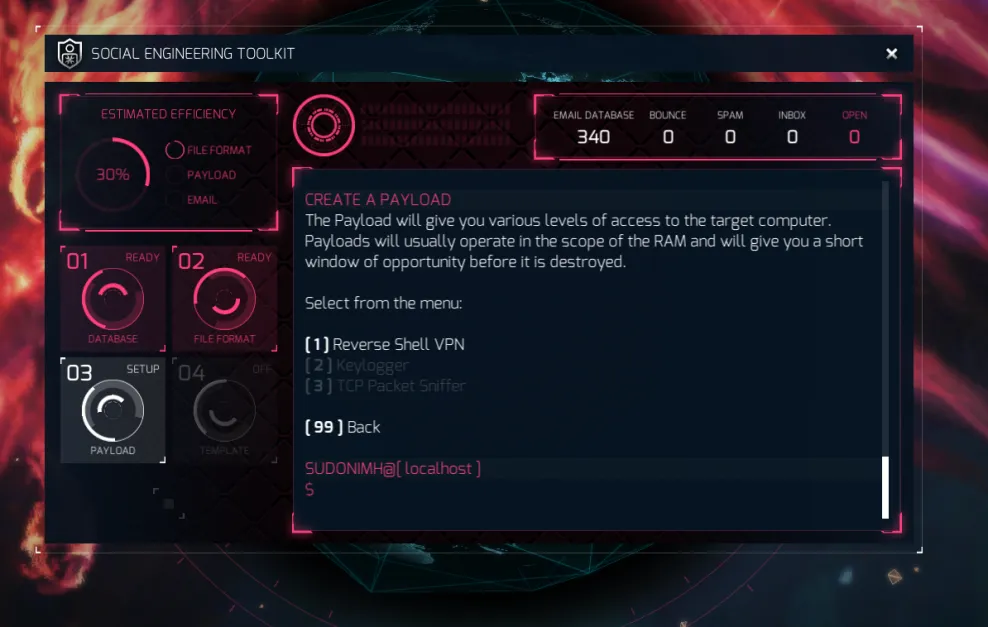
Currently, we only have 1 of the 3 options available to us as agents.
- The Reverse Shell VPN sets up a VNP that we can connect to, giving us access to the target’s computer.
- The keylogger does what it says on the tin.. it logs keypresses!
- The TCP packet sniffer, allows you to sniff those glorious TCP (transmission control protocol) packets!
*Random Fun Fact: TCP is a connection-oriented protocol, where as UDP is connectionless! This means that TCP wants to verify the packets were received in the correct order! UDP just kind of splooges the packets and the requested doesn’t get them all in order, oh well. A good use of that is video. Who cares if you miss a packet or two… right?*
As we can only select the first one, let’s do that!
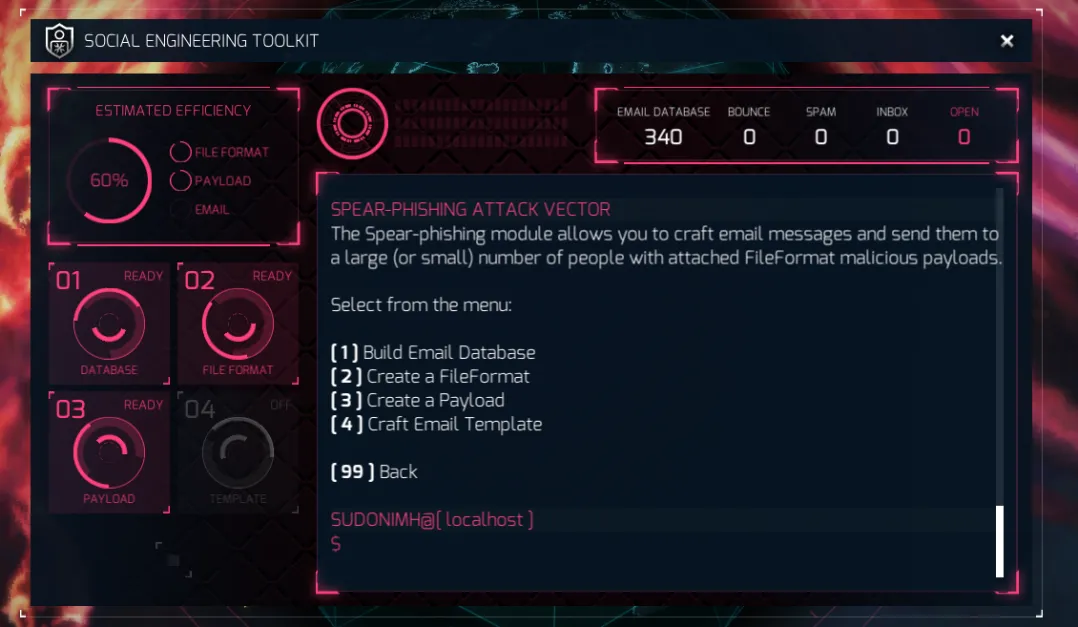
Nice! Look at that efficiency! It’s gone up to 60%! We’re on the right track.
Now we move on to the template for the email:
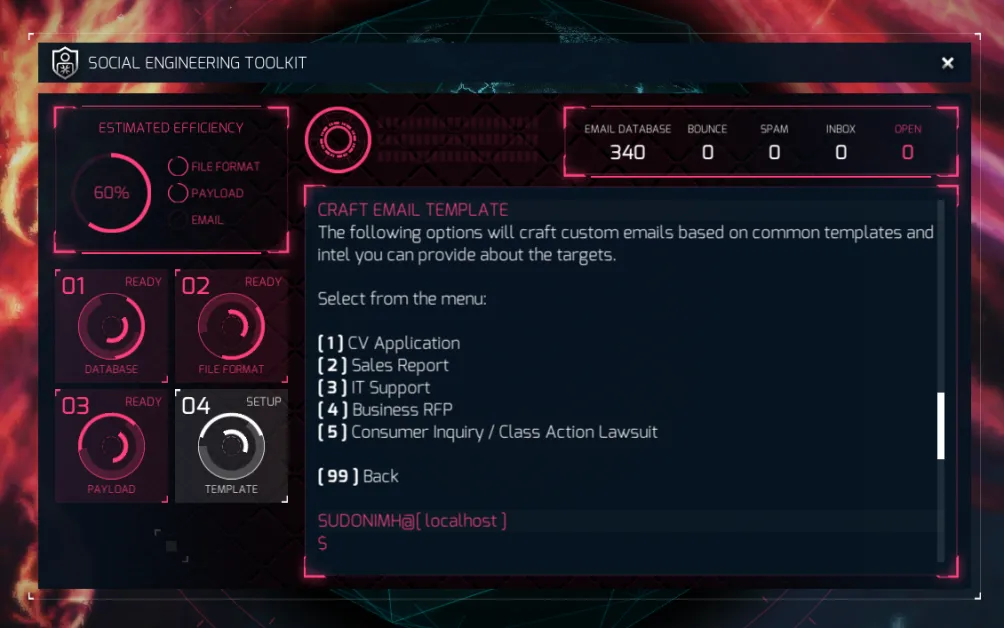
We get 5 different templates to use in our attack.
- CV Application: An email template for someone sending in their CV or resume to apply for a job.
- Sales Report: Someone is sending sales report information, which could be like our quarters sales etc..
- IT Support is pretty obvious… I can’t login! I’m stuck! I want to to know what this thing is…
- Business RPF - RFP stands for “Request for Proposal”. Usually this is sent to companies by another company giving a list of requirements for a project to allow the company to place a bid on the contract. A common example is when a company sends an RPF to a bunch of 5.5. 5.construction companies, wanting a building built. This gives companies a chance to compete and try and win with their bid.
You can help narrow it down by thinking about what your target would expect. Do you think that a company that sells shoes would be used to getting an RFP? Yeah, probably not. They are more likely to SEND an RFP than receive one.
Once you have selected the template you want, you need to give SET two pieces of information:
- Email Subject: This is the subject of the email. Think about the template you selected, the type of company you’re sending it to. You want them to open the email and read it and then click that link.
- The name of the person or company sending the email.
Basically you’re spoofing, so .. think about your target agents!
Again, you can use the efficiency meter in the upper left to make a decision as to which one you want. I could list all 5 and make you pick again, but I won’t in the interest of how long this tutorial is already! In the end, I ended up with this:
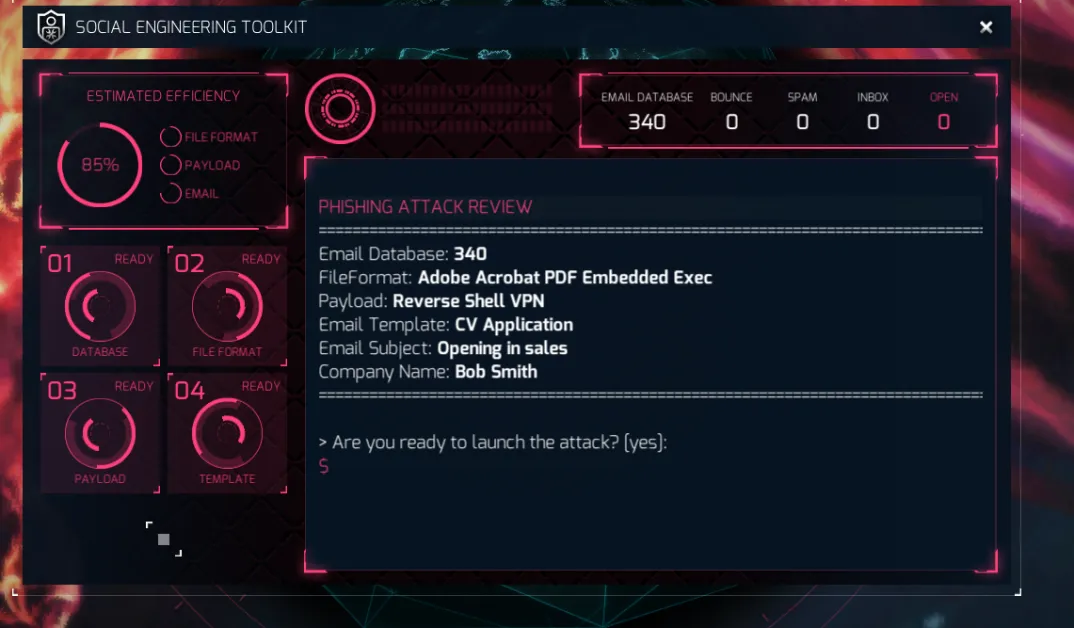
Just look at that glorious 85%! And now .. we type yes!
…and now we wait.
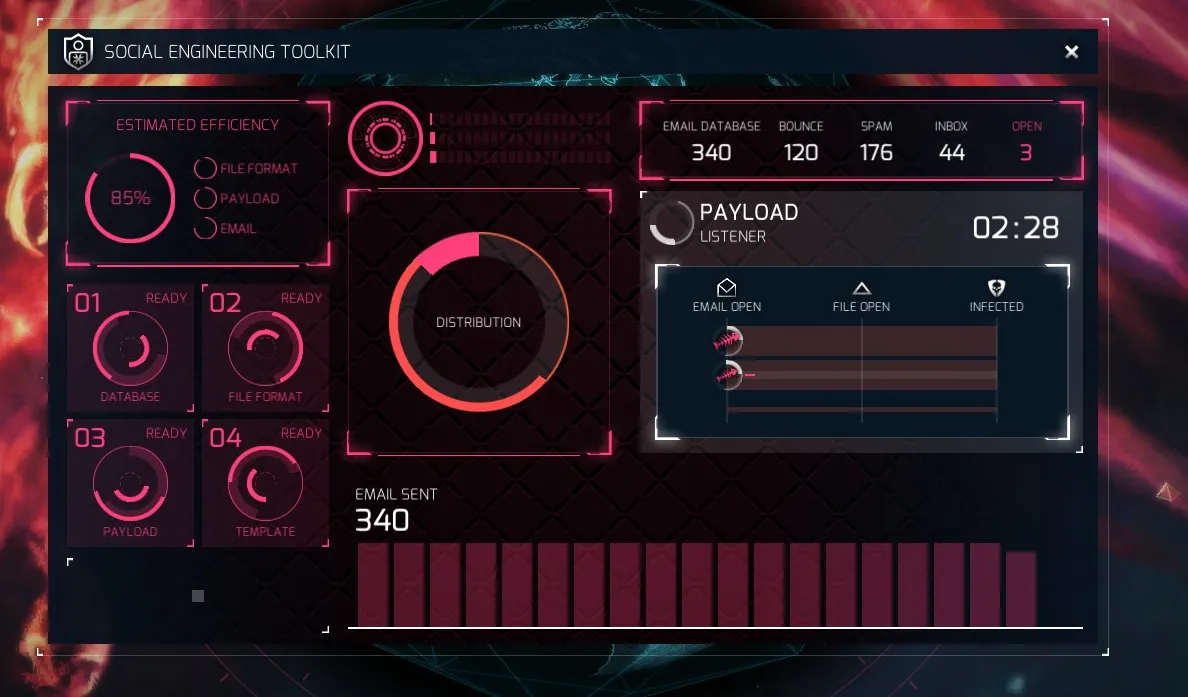
Well, looking in the upper left we see that 120 of those emails bounced, meaning there was no mailbox for those emails. 176 were caught by a spam filter of some kind, and 44 landed in someone’s inbox! Fingers crossed agents!
Sweet! Someone’s reading the email. Hopefully the template we used inspires them to open the file!
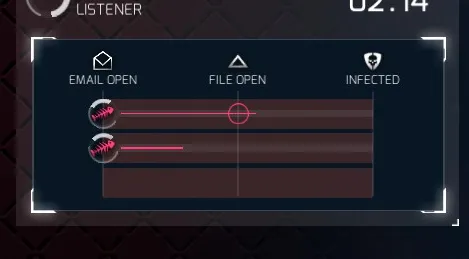
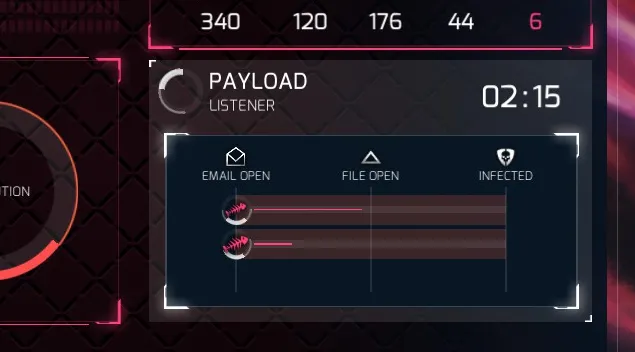
Yes! They opened the file!
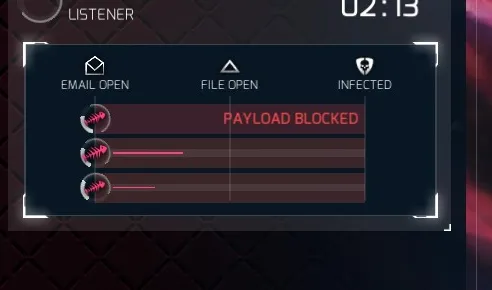
Oh bugger! Our selected payload was blocked, probably by an AV. But .. someone else was reading it, opened the file, and…
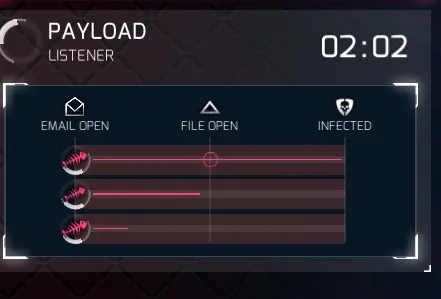
…YES our payload has been delivered!
Once this happens, you’ll get a brand new Turbine C2 registry to click, connect to, and continue the investigation!
Good luck, agent! I hope this tutorial serves you well!
A massive thank you to Agent Morion, who posed the question, sat patiently while I typed it all out, and asked damn good questions as we went! You’re an inspiration agent!